This is a guide on configuring network in CentOS 6.x in Virtual Box with screenshots (using terminal).
[UPDATE: This guide can also be used to configure network on CentOS 6.5]
So, here I have used CentOS 6.3 minimal and will be discussing on configuring the Virtual Box and CentOS for network access. If you need help installing CentOS minimal in the Virtual Box, you can find the instructions in my earlier post here.
Requirements:
- Virtual Box
- CentOS 6.3 or 6.5 (I have tested this on CentOS 6.3 and CentOS 6.5, you can use it on other 6.x versions too)
Step 1: Configure Virtual Box Network Settings:
There are different modes or ways you can configure your Virtual box network settings.
- Not Attached
- NAT
- Bridged Adapter
- Internal Network
- Host-Only Adapter
- Generic Driver
You can find more details about the different modes here.
I will be using the Bridged Adapter mode for this guide. It is faster as it treat the VM as an individual host within the network.
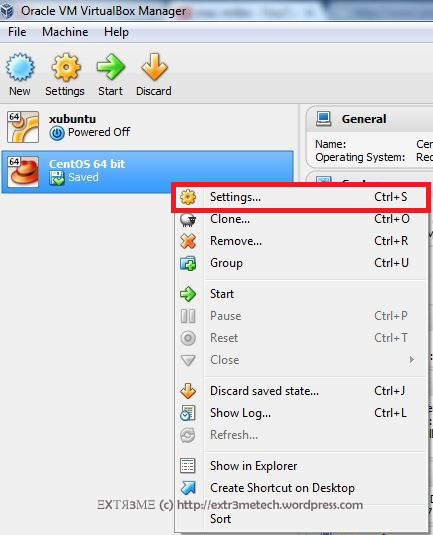
Open Virtual Box and right click on your CentOS VM, and click on “Settings“.
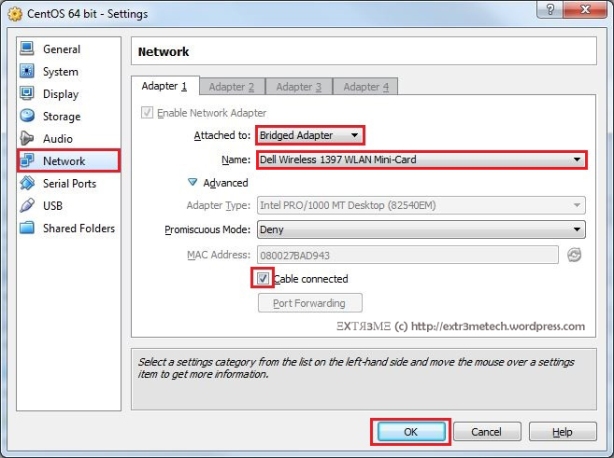
Now, go to the tab Network and change the “Attached to” field to “Bridged Adapter”. Then choose the “Name” to your network interface. For example, I have a dell wireless adapter, so I choose the Name as “Dell Wireless” from the drop down menu. And finally check the field “Cable Connected”. Finally, click on OK when you are done.
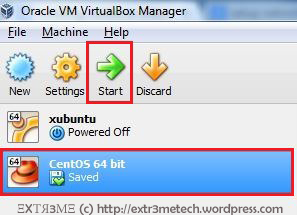
So, you have now configured the Virtual Box. Now, you can start your CentOS VM by selecting you VM and clicking on “Start”.
Step 2: Configure CentOS network settings:
You can configure your network either by using Dynamic IP addressing assigned by your DHCP server or you can manually configure your IP Address statically. You can choose either static or dynamic method and can do so by editing the file /etc/sysconfig/network-scripts/ifcfg-eth0.
Method 1: Dynamic IP
We can configure the network by using Dynamic IP address which are assigned automatically by the DHCP server. This is the simplest way to configure your network.
NOTE: You will have a line that starts with HWADDR in the your config file, do not change or modify that line.
In your terminal, type the following:
vi /etc/sysconfig/network-scripts/ifcfg-eth0
Now, add/modify the file as follows (DO NOT CHANGE the HWADDR line your config file):
DEVICE=eth0
BOOTPROTO=dhcp
ONBOOT=yes
NM_CONTROLLED=no
HWADDR=08:00:27:08:47:E9
Now, save the file by pressing “ESC” and typing :wq and hit ENTER.
To view your network config file. type the following in the terminal:
cat /etc/sysconfig/network-scripts/ifcfg-eth0
Now, you will have to restart your network. You can do so by typing the following in the terminal:
service network restart
To view your IP address, type the following in your terminal:
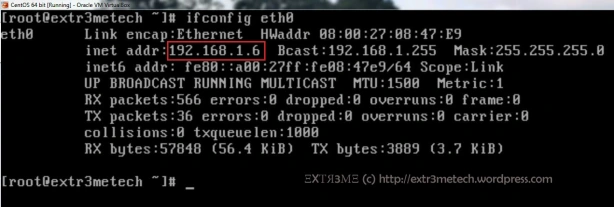
ifconfig eth0
You can see your IP Address of the interface eth0 next to the field “inet addr:” as shown below:
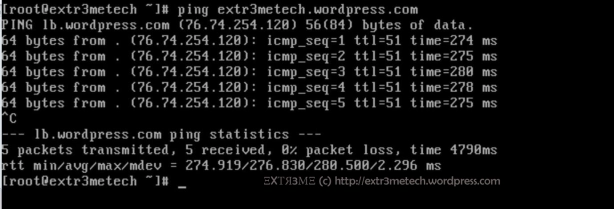
Now, if you have internet access, then you can check if you are able to ping any website. And you should be able to get the reply. For example, in your terminal type:
ping extr3metech.wordpress.com
You can press CTRL+ C to stop the ping command.
So, Hurray! you have successfully setup up your network in your CentOS Virtual Box.
Method 2: Static IP
We can also assign the network information manually by assigning the IP Address, NETMASK , GATEWAY in the network interface config file.
NOTE: You will have a line that starts with HWADDR in your config file, do not change or modify that line.
Step1 : In you terminal, type:
vi /etc/sysconfig/network-scripts/ifcfg-eth0
Now, edit/merge the file to the following
DEVICE=eth0
BOOTPROTO=static
ONBOOT=yes
NM_CONTROLLED=no
HWADDR=08:00:27:08:47:E9
IPADDR=192.168.1.30
NETMASK=255.255.255.0
GATEWAY=192.168.1.1
Now, press ESC and type :wq and hit ENTER to save and exit the configuration file.
To view the config file. type the following in the terminal:
cat /etc/sysconfig/network-scripts/ifcfg-eth0
Step 2: Change Host name:
To change host name , you have to edit the config file /etc/sysconfig/network. If you want to know to change the host name manually, you can follow the guide I have posted earlier here.
Step 3: Assign DNS Server IP
To manually assign primary and secondary DNS Server IP addresses, in your terminal type:
vi /etc/resolv.conf
Now, edit this file to the following:
nameserver 8.8.8.8
nameserver 8.8.4.4
Now, press ESC and type :wq and hit ENTER to save and exit the configuration file.
Now, if you want you can make sure you have entered and saved the correct configuration(It is a good practice to double check 😀 ). To view your dns config file, in your terminal type:
cat /etc/resolv.conf
Step 4: Restart network:
Finally, all you have to do is to restart your network service. To so so, type the following in the terminal:
service network restart
Now, you can check your Current IP configuration, by typing the following in the terminal:
ifconfig eth0
Now, if you have internet access, then you can check if you are able to ping any website. And you should be able to get the reply. For example, In your terminal type:
ping extr3metech.wordpress.com
You can press CTRL+ C to stop the ping command.
So, Hurray! you have successfully setup up your network manually in your CentOS Virtual Box.
Hope this guide helped you to configure network in your CentOS Virtual Machine.
If you have any queries or suggestions regarding this guide, feel free to leave a comment and will get back at you. Don’t forget to follow my blog to get future updates! ![]()
ΞXΤЯ3МΞ




These steps are perfect!!! Thank you so much EXTR3ME
@Deepak, Your Welcome! Thanks for visiting my blog! 🙂
fantastic…
@Edd Tortona , Thank You !! 🙂
Thank you for a very straight forward explanation that works.
@Gaetan de Speville, Your welcome! Thanks for visiting my blog! You can subscribe to my blog to get future updates.
ΞXΤЯ3МΞ
Nice tutorial buddy
I have installed this on a dedicated server, is there any way I can connect to the system via ssh from a remote machine.
In fact, I have been trying to figure this out since 3 hours but have failed to achieve.
@Anand, you need to install openssh server in your dedicated server and make sure port 22 is open and the service is started. For your information, the config file will be located in /etc/ssh/sshd_config
In the client, install the ssh client and you should be able to connect to the server.
Let me know if you need any further help. You also can subscribe to get future updates.
Regards
ΞXΤЯ3МΞ
Hi, i’d like to thanks for your great effort to help and explain step by step with excellent text with pictures.
@moscardo, You are welcome. Thanks a lot for visiting my blog!
Regards
ΞXΤЯ3МΞ
This was exactly what I needed!
@Pedro, Thanks for visiting my blog! 😀
Regards
ΞXΤЯ3МΞ
Nice.
@Leandro, Thank You!
Regards,
ΞXΤЯ3МΞ
Thanks a lot.
@Pavel, Your Welcome! Thanks for visiting my blog!
Regards
ΞXΤЯ3МΞ
Thank you very much for this outstanding work.
@Nofear, Your Welcome! Thank you for visiting my blog!
Regards
ΞXΤЯ3МΞ
Thanks, very helpful!
@Marcio, Your Welcome! Thanks for visiting! 🙂
Regards
ΞXΤЯ3МΞ
hi. I have 2 boxes with fedora ( for development) and CentOS 6.4. I am going to use wireless. if you are using wireless instead of eth0, would the process be the same?.
Thank you
@Albert , It should work. As you can see , I have used my Dell wireless connection in my virutal box setup as shown in the image https://extr3metech.files.wordpress.com/2013/04/nw-settings.jpg .I simply edited the default interface name eth0 for simplicity. If you want , you can also create another interface like wlan0 and edit it instead of editing eth0. Let me know about your experience with setting it up and post here if you need any further help. Hope this helps!
Regards
ΞXΤЯ3МΞ
Thanks you very much !
@Doãn Son , Your Welcome. Thanks for stopping by! 😀
Regards
ΞXΤЯ3МΞ
Hey man, it is amazing, we use it for web development server, and you save us a lot. thanks 🙂
@Fachim, Your Welcome! Thanks for visiting my blog! 🙂
Regards
ΞXΤЯ3МΞ
when i try service network restart it says: Device eth0 does not seem to be present, delaying intialization [FAILED]
@Patrick , This happens usually if the interface was renamed. Please post the output of the following command here:
# dmesg|grep eth
Regards
ΞXΤЯ3МΞ
Gracias amigo estupendo tutorial me servio mucho.saludos
what i have to type in my local machine to enter in the web config?
@Zerox , Could you please elaborate the question? And if possible add in a few more details it.
Regards
ΞXΤЯ3МΞ
Thank you Its really Useful.
@Dinesh, Your welcome! 🙂
Regards
ΞXΤЯ3МΞ
Nice one, saved me hours of head scratching as a CentOS newbie.
@Martijn Verburg, Glad this article could help you out. 😉
Regards
ΞXΤЯ3МΞ
Thanks..It is a great post
@charindusblog, Your Welcome! 🙂
Regards
ΞXΤЯ3МΞ
If I choose dhcp, my network address becomes a private address, like 192.168.2.3. I get internet connection, so it works fine. Is there a possibility to give centos the same ip as the external (static) ip address of the internet connection?
(I have a Airport Extreme router between them inside my network.)
I have tried the static option you described and set the ip address as the external address (62.x.x.x) and filled in the subnet mask and router address and dns. But when I try this the internet connection gets lost.
Extremely Helpful
Brilliant! you saved my life
@Hermione, 🙂
Regards
ΞXΤЯ3МΞ
nice tutorial this work perfectly
can you add some tutorial about how to add repository in centOS.. it will be so helpfull..
thanks
Just what I needed. Thanks!
@Adam Cooper, Your welcome 🙂
Regards
ΞXΤЯ3МΞ
The MAC address in your screen shot is different than the HWADDR in your config file. Is that a mistake? Most resources on the net say those need to be in sync.
@Paul, When you initially edit the file, there would be a HWADDR already in the config file which would be already in sync with the MAC address mentioned under network settings of the Virtual Box. I have mentioned in the section “Method 1: Dynamic IP”, to keep the default MAC address in your config file as it is, as it would be already in sync. (In the screenshot, the MAC is different, I had changed the MAC address for testing purposes). And yes Paul, these settings must be in sync. Hope I have clarified all your quires. Leave a comment if you have any further queries. Hope this helps!
Regards
ΞXΤЯ3МΞ
Nice tutorial. I was failed to install Centos 64-bit using all DVD/CD iso’s other than the minimal install I did not why, Therefore this tut is very usefull
I would like to see GUI for CentOS. could you kindly explain me please how to do that?
Thank Extreme… Good luck for you 🙂
@trantuanson1991, Your Welcome! Thanks a ton for your support!
Regards
ΞXΤЯ3МΞ
just wanted to say thanks for the detailed guide, it helped me!
@Periklis, Your Welcome! Thank You for visiting my blog 🙂
Regards
ΞXΤЯ3МΞ
Thank you
@Tuyen Nguyen, Your Welcome!
Regards
ΞXΤЯ3МΞ
Thanks for posting this, it helped tremendously!
@Michael, Your Welcome! Thanks for stopping by! 🙂
Regards
ΞXΤЯ3МΞ
thank you very much…
@luismalamoc, Your Welcome!
Regards
ΞXΤЯ3МΞ
Awesome post and very helpful. Thank you.
@Nepidd, Your Welcome! 🙂
Regards
ΞXΤЯ3МΞ
Thank you dude!
@Jules César, Your welcome! 🙂
Regards
ΞXΤЯ3МΞ
Thanks very much! 🙂
@Quan, Your Welcome! 🙂
Regards
ΞXΤЯ3МΞ
Hi ..i have configured Oracle virtual box and ontop of it ihave installed oracle linux6.4 ..i want to connect inter through my virtual machine but i can’t.Eeven i have configured everything what you have mentioned but i can’t please assist me on this. Here i have configured DNS and hostaname and all..please find the below
Its all configured Bridged adaptor in virtual box.
————————–
[root@oraclelinux6 ~]# cat /etc/hosts
3.209.xxx.x oraclelinux6.localdomain
————————————–
[root@oraclelinux6 ~]# route
Kernel IP routing table
Destination Gateway Genmask Flags Metric Ref Use Iface
default 3.209.xxx.x 0.0.0.0 UG 0 0 0 eth1
3.0.0.0 * 255.0.0.0 U 1 0 0 eth1
192.168.122.0 * 255.255.255.0 U 0 0 0 virbr0
——————————————————————————–
[root@oraclelinux6 ~]# cat /etc/resolv.conf
# Generated by NetworkManager
search localdomain
nameserver 3.209.xxx.xx
nameserver 3.209.xxx.xx
[root@oraclelinux6 ~]# cat /etc/sysconfig/network-scripts/ifcfg-eth1
DEVICE=”eth1″
BOOTPROTO=static
IPADDR=3.209.xxx.x
NETMASK=255.255.255.0
GATEWAY=3.209.xxx.x
DEFROUTE=yes
ONBOOT=yes
TYPE=Ethernet
PREFIX=8
DNS1=3.209.xxx.xx
DNS2=3.209.xxx.xx
IPV4_FAILURE_FATAL=yes
IPV6INIT=no
NAME=”System eth1″
UUID=9c92fad9-6ecb-3e6c-eb4d-8a47c6f50c04
LAST_CONNECT=1397468379
———————————————————————————-
[root@oraclelinux6 ~]# cat /etc/sysconfig/network
NETWORKING=yes
HOSTNAME=oraclelinux6.localdomain
GATEWAY=3.209.xxx.x
——————————————————————————–
[root@oraclelinux6 ~]# ping google.co.in
ping: unknown host google.co.in
[root@oraclelinux6 ~]# ping yahoo.com
ping: unknown host yahoo.com
Can you please help me where i did wrong??
..typo error on the above
“I want to Connect internet*” through my Virtual machine(OEL 6.4)
Excelent!!, thank you!! very util!!
Thanks a lot! I read a bunch of posts on other websites, everyone of them over complicated this stuff and I still wasn’t able to provide connectivity to the box. Your steps worked to perfection for me.
A lot of thanksgiving around, but couldn’t help but not adding to these! Very helpful step-by-step indeed!
This made my life easier, thanks.
@needingsleep3, 🙂
Regards
ΞXΤЯ3МΞ
Thanks!!!
@Wellington Torrejais, Your Welcome !
Regards
ΞXΤЯ3МΞ
Thanks A Lot
thanks a lot. its working 🙂
A really good tutorial! 🙂 How would I be able to connect to that CentOS-Server with a virtual (let’s say Fedora) Client within Virtualbox? Will I have to do this via the bridged connection?
@Kenneth Plasa, Thanks! Yes, you can connect your Centos VM with another linux vm using bridged connection if you have setup CentOS in bridged mode as mentioned in the above tutorial. There are also other methods you can use to connect/network your VMs together and you can read more about them by using this link: https://www.virtualbox.org/manual/ch06.html
Hope this helps.
Regards
ΞXΤЯ3МΞ
Thank you for taking the time to post this. The steps were perfect and worked well for me.
Thanks very very much, man. I spent almost 4 hours before have found this tutorial!
Thank you so much. Very usefull
Dynamic IP worked perfectly for me for CentOS 6.6 🙂 thanks!
@Meg, Your Welcome!
Have a nice day 🙂
Regards,
ΞXΤЯ3МΞ
Thanks, working here too on centos 6.7
I’m getting “unknown host http://www.google.com” when I try to ping. I went through this tutorial in full. Any suggestions on what the problem could be? I’m running VirtualBox on a system of machines that is connected to our companies internal network, but also has a network switch for the system of machines to be able to talk to one another directly.
Any type of help/feedback is appreciated!
Hi Sean,
Are you behind a company firewall? Did you restart your network after configuration? Also, did you change your virtual box network setting to “Bridged Adapter”?
It would be great if you could post output of the following :
# cat /etc/redhat-release
# ifconfig
# cat /etc/resolv.conf
# cat /etc/sysconfig/network-scripts/ifcfg-eth0
# ping 192.168.1.1
Regards,
ΞXΤЯ3МΞ
works great brother thnku……
Hi Ayan,
Your Welcome! Thanks for visiting! 🙂
Regards,
ΞXΤЯΞМΞ
dope
Excellent guide thanks a ton!!!
@viraj, Your welcome! Thanx for stopping by.
Regards,
ΞXΤЯ3МΞ
Thanks a lot i am now able to working ………my vm can connect to internet
Thanks a lot i am now able to work. my vm can connect to internet
@Albert,
Glad to know it worked! 🙂
Regards,
ΞXΤЯ3МΞ
I am using ClouderaVM for centos6.7. Recently, i tried to update centos 6.7 using ‘yum update’ command and stopped it without completing the update. Now I am able to ping ‘www.google.com’ but while using firefox, I am not able to connect to internet and getting error ‘Server not found’. Also yum is also not working now and giving error [Errno 14] PYCURL ERROR 6 : ”Could not resolve host ‘mum-bluecoat01” . Could you please help me here?
Hey Dipankar,
#yum clean all
#yum update all -y
Try if the update fixies the problem.
Hello Anoop. Thanks for your step by step guide.
I was able to configure static ip for centos 7 running on a virtualbox using your steps.
However, the static ip often change to dynamic ip during a long-running scp job to another centos. Static ip would then return with network restart.
Any idea on how to avoid this ip change?
@Ben, sorry for the late response. Are you still facing this issue? This sounds more like a bug to me.
Good Article! Really helpful..
@Shahikant, Thank you.
Hi, when i try to assign static ip to centos 6.6.in VM virtual Box.static ip successfully configured but need to connect internet connection not able to connect
kindly help on this
@sagar, are u able to ping the gateway?
Big thanks! Have no idea what exactly fixed my problem, but it is fixed now
Thank you very much. This was exactly what I needed also I really appreciate to your blogs.