Posts Tagged ‘how to’

Hi guys, this is a post on creating a simple text mode menu in Python 2.7.x. Hope this helps! Below is the output of the sample menu that we will be creating:

Sample Menu

------------------------------ MENU ------------------------------
1. Menu Option 1
2. Menu Option 2
3. Menu Option 3
4. Menu Option 4
5. Exit
-------------------------------------------------------------------
Enter your choice [1-5]: 

Here we have a function print_menu() which is used only to print the menu and the options available. This function does not take any inputs.

The source we have here creates a menu with 5 options with the 5th option to exit the menu.

Here, we create a Boolean variable named “loop” and set its value to “True“. Then we create a while loop which will run until the value of “loop” is “False”.

And within the while loop, we call the function print_menu() in which the user is presented with a menu and the list of options. We now request the user input and store it in a variable named “choice” [NOTE: The input must be a number and not any character or else it will through a error].

Now, we use create if statements to check the value of choice. For example: the first if statement checks if choice==1 and if it prints “Menu 1 has been selected”. Similar, We make use of elif statements to check other values of choice.

And when choice==5, we change the value of “loop” to “False” , which will end the while loop as it will only run when the value of “loop” is “True“.

Finally, for all other numbers other than 1,2,3,4 and 5, we simply print and error message and requests the user to enter a valid input and to try again.

Source Code:

## Text menu in Python
     
def print_menu():       ## Your menu design here
    print 30 * "-" , "MENU" , 30 * "-"
    print "1. Menu Option 1"
    print "2. Menu Option 2"
    print "3. Menu Option 3"
    print "4. Menu Option 4"
    print "5. Exit"
    print 67 * "-"
 
loop=True       
 
while loop:          ## While loop which will keep going until loop = False
    print_menu()    ## Displays menu
    choice = input("Enter your choice [1-5]: ")
    
    if choice==1:     
        print "Menu 1 has been selected"
        ## You can add your code or functions here
    elif choice==2:
        print "Menu 2 has been selected"
        ## You can add your code or functions here
    elif choice==3:
        print "Menu 3 has been selected"
        ## You can add your code or functions here
    elif choice==4:
        print "Menu 4 has been selected"
        ## You can add your code or functions here
    elif choice==5:
        print "Menu 5 has been selected"
        ## You can add your code or functions here
        loop=False # This will make the while loop to end as not value of loop is set to False
    else:
        # Any integer inputs other than values 1-5 we print an error message
        raw_input("Wrong option selection. Enter any key to try again..")

Feel feel to leave a comment if you have any queries or want to reach out to me. You can also Follow/Subscribe to my blog to get future blog posts! Happy Bloggin! 🙂

Regards
ΞXΤЯΞМΞ

I have just installed CentOS 6.5 (minimal)  in Virtual Box on my Windows 8.1 pc. This is how I installed CentOS. Hope this helps.

[Update: The updated version of this article with screenshots for CentOS 6.7 can be found here.]

Requirements:

  1. CentOS 6.5 32-bit ISO : Download Link (~330 MB)
  2. Virtual Box : Download Link (~110 MB)
  3. Atleast 8 GB of free disk space.

Installation Procedure:

First, thing you need to  do is to set up your Virtual Box. Go ahead download and install Virtual Box (the download link is given above in the requirements).

Press “New“, Type Name as “CentOS 6.5 32 bit” or anything you want. Set the type as “Linux“, Version as “Red Hat 32 bit“. And press “Next”.

create vm

name and type of OS pic

Allocate RAM to 512 MB RAM or higher , then click “Next“.

select ram size pic

Then select the option “Create a virtual hard drive now “, then click on “Create“.

create hd pic

Select hard drive file type as the first option “VDI” , then click on “Next“.

hard disk type: vdi pic

Select type as “Dynamically allocated“. Choose the amount of hard disk space you want to allocate for your CentOS system. Select atleast 8Gb-10GB or higher and then click on “Create“.

VM HD size pic

Now, you would see the home screen of the Oracle Virtual box, Click on the CentOS VM you have created and then click “Start“.

start vm

Then click on the yellow folder icon and select the ISO file that you have downloaded.

Select ISO location

Then click on “Start“.

start boot

Wait for a few seconds and you will see the CentOS boot menu. Now, select the first option “Install or upgrade an existing system“.

Boot menu picture


[Note: To scroll through different options, you can either use the Arrow keys in your keyboard or the TAB key to move through different options . You may also use SPACE bar in your keyboard or ENTER key to make selections]

Now, you will probably get a message box saying “Disk Found” and if you want to verify the contents in the CD. Press “Skip”. If you need, you can press “OK” and verify the contents but it might take a while.

Using your arrow keys, select “Skip” and then hit “Enter“.

Disk check pic

loading screen

Hit “OK“.

CentOS Welcome

Now, select the language and then use the TAB key and then select “Ok” and hit ENTER.

select language

Now, select the model of the keyboardand then select “OK“.

keyboard selection pic

If you get a “Warning Message” such as the one below, just chooseRe-initialize all“.

Re-initialize all picture

Now, select your time zone and then hit “OK“. Then select a password for your “root” (or admin account), you can use TAB keys to reach the next box, and finally select “OK” and hit ENTER.

create root password

Now, select the option “Use entire drive“, and select “OK”.

allocate hard drive picture

Now, select “Write changes to disk” and the installer should start right up.

installation picture

installation progress pic

After, it is done installing , you will see a message saying “Congratulations, your CentOS installation is complete“. Select “Reboot” and hit ENTER.

installation complete -Reboot

Now, it should boot right up.

centos bootup picture

now, type login as: root , Then hit ENTER. Then type the password and hit ENTER. You should see now be able to see the terminal window with the # symbol.

root login pic


And voilà ! You have successfully installed CentOS 6.5 in Virtual Box.

This is a minimal mode CentOS and so many application packages are not installed. You will also have to configure the network to access the internet.

[UPDATE: To configure network in CentOS 6.5 (which is the same as configuring centos 6.3), I have made a detailed guide with screenshots, you can find it here.]

If you have any sort of queries on regarding this installation, just leave a comment and will get back at you. Don’t forget to follow my blog to get future updates! :D

Regards
ΞXΤЯ3МΞ

This is a simple guide on installing Python 2.7.8 in Windows 8.1 operating system with screenshots.

Requirements:

  1. Windows 8.1 / Windows 8 OS
  2. Python 2.7.8 : Download Link (~15.92 MB)

Step 1: Installation

Download the python setup file mentioned above and run the installer.


installer window picture

Click “Next”.

2

Leave it to the defaults and then click “Next“,

installation directory picture

Now in customize screen, you may see a RED X next to “Add python.exe to Path”.

Customization Screen picture

Click on the RED X and then select the first option option “Will be installed on local hard drive”.

custom selection picture

So finally you will have the below screen:

customization final

Then click on “Next“, and follow the on screen instructions:

progress picture

Finally, click on “Finish“.

python installation complete


Step 2: Running the Python Interpreter.

Now, to open Python Interpreter in your Windows 8.1 machine, Press Windows key+X (Press Windows key and while pressing CTRL , tap the letter R once) , you will see a context menu (shown below), click on “Command Prompt (Admin)“. (Click Yes if prompted from User Account Control)

cmd run as admin picture

You will now see the windows command prompt window as shown below:

command prompt admin window picture

Now, type python and then “Enter” in your keyboard to start using the DOS interactive python interpreter.

12

Now, you test it by writing a simple print statement, such as:

print “Hi EXTR3ME”

and then hit “Enter“, you will see the output in the next line as shown below:

python dos shell output

You should have by now installed Python 2.7.8 in your Windows 8/8.1 systems and also written a sample program to test it.

Hope this helps. Feel free to leave a comment below or if have any further queries. 

Don’t forget to subscribe to get future updates! 🙂

Regards
ΞXΤЯ3МΞ

If you are not able to find the Developer options after updating to Android 4.3 in your Xperia (mine is a Xperia M ), then do the following:

In your phone open “Settings” page, then click on “About phone”  scroll down to “Build Number” and keep tapping on it until you get the message “You are now a developer”. 🙂

Build option

Now, Go to Settings and then scroll all the way down, and just above “About Phone” you would see “Developer Options”and click on it.

Developer options

Click on it. Then Make sure the top “Developer options” is selected, and then check the option “USB Debugging”.

USB debugging option

Then click on “OK“.

confirmation screen

Finally, you will have :

USB debugging turned on

Hope this helps! Don’t forget to follow my blog to get future updates! Hope you have great day. Happy Blogging!  🙂

Regards,
ΞXΤЯ3МΞ

This is a guide on how to install Zorin OS 7 (64-bit) in Virtual Box. Hope this helps!

Requirements:

  1. Zorin OS Core ISO : Download Link (~1.5GB)
  2. Virtual Box : Download Link  (~96 MB)
  3. Atleast 8 GB of free hard disk space.

Installation Procedure:

First, download and install Virtual Box in your computer using the download link mentioned above. Also, download the Zorin OS ISO to any location of your choice.

Open Virtual Box, click on “New“:

1

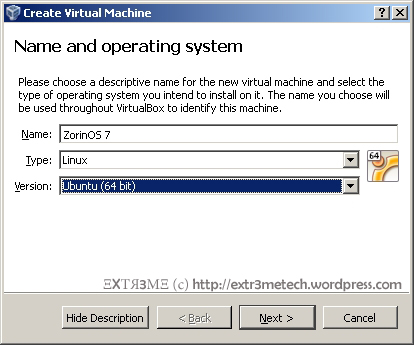
Now, enter “Name” anything as you wish, Type asLinux” and Version asUbuntu (64-bit)“. Then, click on “Next“.

Name and Operating system

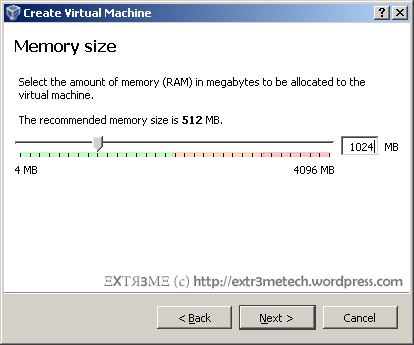
Now, select the amount of RAM you want to allocate for your Zorin OS Virtual machine. I would recommend a minimum of 512MB-1024MB. I have allocated 1024 MB (i.e. 1 GB of RAM) for my Zorin OS VM.

Memory Size

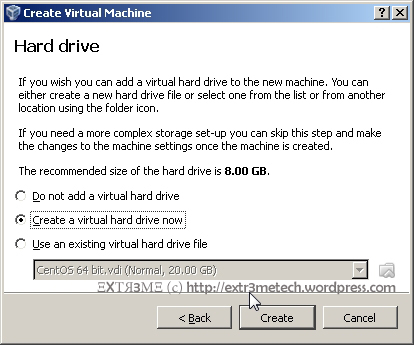
We need to create a virtual hard drive. Click on “Create a virtual hard drive now” and click on “Create“.

Create Hard Drive

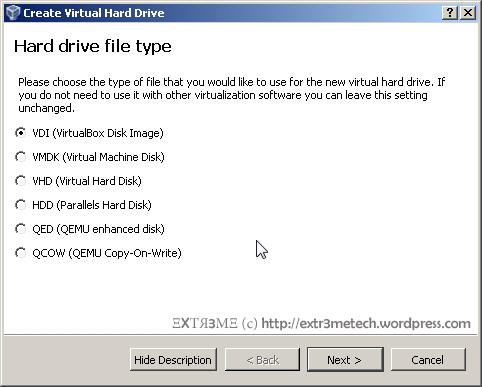
Now, select the option ” VDI(Virtual disk Image) ” and click on “Next”.

Hard Disk Type

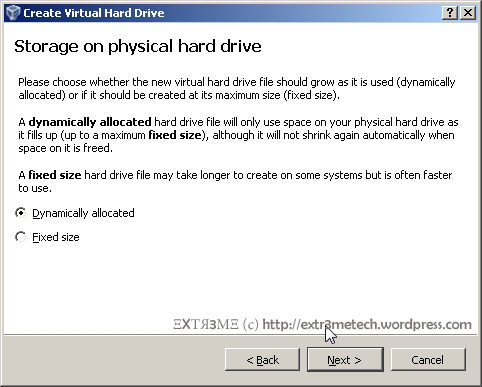
Now, select “Dynamically allocated“. {NOTE: You can also go with fixed size if you want but it will take longer time to create but is faster to use }

Storage Type

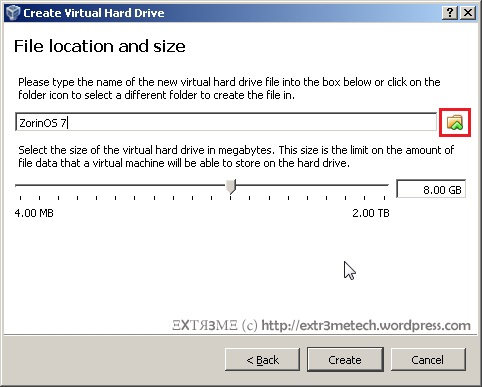
Now , you can select the size of your virtual hard disk by dragging the slider across. You can also choose a custom location where you want to save your Zorin OS by clicking on the red box that I have highlighted. Make sure you allocate a minimum of 8 GB. After selecting the appropriate options, click on “Create“.

7

Now, Click on the Virtual machine, you created and click on “Start“.

9

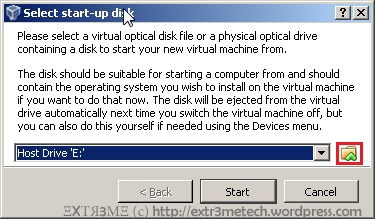
Now, click on the small folder icon which I have highlighted in red and browse to the ZorinOS ISO file you have downloaded earlier.

10

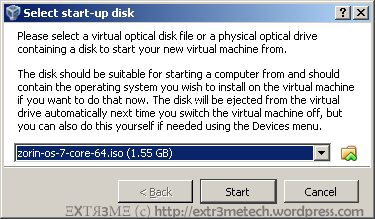
11

Now, click on “Start” once you have selected the ISO file.

12

To start the installation, select the option “Start the installer directly“.

13

Wait a few moments for the installer to load.

14

Select the Language of your choice and click on “Continue“.

15

Click on “Continue“.

16

Select “Erase disk and install Zorin“.

17

After this step, you would be prompted to select your location. You can click on the map to select your location and click on “Continue“. Then select the keyboard layout of your choice and click on “Continue“.

19

Now, you can enter “Your Name” , “Your computer’s name” , “username” and a “password” of your choice and click on “Continue“.

20a

Now, it will copy the nessasry files and install the Zorin OS.

21

This may take a while depending on your computer configuration.

23

You will get a prompt stating that the Installation is complete. Click on “Restart Now“.

24

Hit on the “ENTER” key when prompted.

25

Select the first option “Zorin” and hit “ENTER” in your keyboard.

26

This should boot up your installed Zorin OS.

27

Enter your login credentials that you created earlier during the installation phase.

28

You should be able to see your home screen and the Z button which is similar to the start button in Windows based systems in the lower left corner. Clicking that should bring up the menu which is very classy in my opinion and easy for newbies who are migrating from Windows to Linux.

30

You can open up the terminal by simply searching terminal in the search box and it should bring up the terminal.

31

And here is the terminal!

32a

So Hurrayy!! You have successfully installed Zorin OS in Virtual Box !!

I just installed ZorinOS a few days back, and felt that it is a great OS especially for users who are migrating from Windows to Linux. I am still playing around with it and so far I must say it looks interesting. So go ahead, try it out and let me  know what you think. Feel free to leave a comment about it in the comments section below.

If you have any sort of queries on regarding this installation, just leave a comment below and will get back to you. Don’t forget to follow my blog to get future updates! :D

 
ΞXΤЯ3МΞ

  • Creating a .tar archive:

In Linux, we can create an archive file using the tar program and use gzip to compress the archive. This is similar to the WinZip program in Windows where you can compress multiple files or directories into a compressed .zip archive.

For example, first just create a directory called “testdir

# mkdir testdir

Now, change your working directory to testdir and create files “test1.txt”, “test2.txt”, “test3.txt“.

            # cd testdir

            # touch test1.txt

            # touch test2.txt

            # touch test3.txt

Now, create another directory called “testdir2

            # mkdir testdir2

Now, change your working directory to testdir2 and create files “test4.txt”, “test5.txt”, “test6.txt“.

            # cd testdir2

            # touch test4.txt

            # touch test5.txt

            # touch test6.txt

Now, go back your initial directory

            # cd ../..

To see the list of the created directories and files:

            # tree testdir

Now, to create an tar archive using the “c” (create) and “f” (file) arguments with the tar command as follows:

            # tar cf testdir.tar testdir

Now, to seeif the archive was created. You can type the following command:

            # ls -l *.tar

If you want to see if all the files are inside the archive, or if you want to see the contents of the archive, you use the following command:         

            # tar tf testdir.tar

If you want to see the progress in the archiving process, you can add the “v” argument. For example, the command would then would be:

            # tar cvf testdir.tar testdir

You can also make an tar archive in “Interactive Mode” to select which files needed to be added to the archive and which ones you need 2 exclude. This can be done by using the ‘w‘ argument . You can add a file by typing ‘y’ when prompted and ‘n’ for the file you do not need to add to the archive.

For example, if you wanted to exclude files “test2.txt” and “test4.txt from the archive, all you have to do is , use the following command and type ‘n’ when  prompted for “test2.txt” and “test4.txt” and type “y” for the rest of the files.

            # tar cwf testdir.tar testdir        

  • Extracting a .tar archive:

To extract a .tar archive, you can use tar with ‘-x‘ (for extracting) and “-f” and “-v“(to see what is happening or progress of extraction) arguments.

            # tar xvf testdir.tar

To select which files to be extracted you need to use the ‘w’ argument. For example:

            # tar xvwf testdir.tar

Now, if you want to just want to extract a single file from the archive, for example, “testdir/testdir2/test4.txt”, you can use the following command:

            # tar xvf testdir.tar testdir/testdir2/test4.txt

  • Compressing Files using gzip:

We can compress a .tar archive using gzip and the compressed file will be either a .tgz or .tar.gz file.

For example, if you want to compress “testdir.tar” using gzip, you can do it by using the following command:

            # gzip testdir.tar

The resulting compressed file will be “testdir.tar.gz”. So, the compressed file will be the filename with a “.gz” extension by default.

To see the details of the compressed file, you use the following command:

            # gzip -l testdir.tar.gz

To check if the compressed “.tar.gz” file is proper, you can use the following command:

            # gzip -tv testdir.tar.gz

You can also compress the “.tar” archive to a custom extension using the “-S” argument. For example, if you want to compress the arhive “testdir.tar” to “.gzipped”, by using:      

            # gzip -S .gzipped testdir.tar

  • Decompressing using gzip or gunzip:

We can decompress a compressed file using the “gunzip“. The compressed file should have any of these extensions “.gz”, “.z”, “.Z”, “-z” or “-Z” in order to decompress or it will not work.

For example, if you want to decompress the file “testdir.tar.gz

# gunzip testdir.tar.gz

Another way to decompress is by using the gzip program itself by using the “-d” argument. For example:

            # gzip -d testdir.tar.gz

ΞXΤЯ3МΞ

Run-levels

So, what are run levels? Well, they are like different modes in which you can run Linux and different run levels have different configurations. They define what services or processes must be running on the system after boot. They are different run levels in Linux but you can run only one run level at a time.

For example, you can operate in Run-level 5 which have the graphical interface or in run level 3 which will not have the graphical interface.

In Red hat Linux/Fedora, the run-levels are as shown below:

Run Levels       Details

0                      Halt

1                      Single user mode

2                      Multi-user modes without networking

3                      Multi-user mode without graphical interface

4                      unused or can be user-defined

5                      multi-user mode with Graphical interface as well as console logins

6                      Reboot

  • Changing run-levels:

Run-levels can be changed by editing the /etc/inittab file. First, make a backup of your /etc/inittab file

# cp /etc/inittab /etc/inittab.bak

So, open /etc/inittab in your vi editor or gedit editor.

            # vi /etc/inittab

Now, look for the following line :

            id:5:initdefault

Now, you can change the number 5 to any run-level you want. For example, if you want to change the run-level to 3 i.e. to the non-graphical interface, Then just change the change the number 5 to 3.  So, it would be like:

            id:3:initdefault

After making the changes, save the file and reboot. Now, your Linux OS will be running in run-level 3. You can press ALT+F2 to see the log-in prompt.

# reboot

  • Alternative Method to change run levels:

You can also change run-levels by typing “init” followed by the “run-level”. For example, if you want to change to run-level 3, in your terminal type:

            # init 3

This will reboot your machine into run-level 3.

ΞXΤЯ3МΞ